Demonstrations serve a dual purpose of humanizing you to your class so you’re not just a robot-taskmaster emailing them about deadlines, as well as showing and not just telling how something can be done.
The phrase “I’m not an expert, but I watch a lot of YouTube” has taken on new meaning over the last few months, when face-to-face access to the professional hairdresser, chef, or fitness expert feels like a distant memory. As an adjunct professor, I’ve been spending parts of these summer days teaching on Zoom and figuring out how to do it better for whichever of the proposed fall 2020 hybrid learning models the college and university where I teach settle on, come August.
As academics prepare to be at least partly communicating and working with students remotely this fall, now is the time to challenge ourselves to embrace technology we may have been ignoring. What this time affords educators that the slapdash spring conversion to online teaching did not is the opportunity to plan. And teachers love planning. For many of us, it’s why we get up in the morning—every day is a fresh opportunity to break down information into manageable chunks for other people.
Since March, many resources have emerged for educators, so this is not an overview of how to holistically convert your in-person class to draconian folders on your institution’s poorly designed remote-learning platform. For that, I point you towards the internet where good folks have shared nuanced knowledge on how to win your battles with Canvas, Blackboard, Flipgrid, Padlet, and others. There are also many great tutorials for setting up a critique online, instructing students how to photograph their work with only a smartphone, and various classic drawing lessons.
I decided to focus instead on a cornerstone of visual art instruction that has emerged newly important during the age of corona: demonstrations. Depending on the grade level or subject you teach, demos may be your bread and butter, or you may only do a few in a typical school year. But this is not a typical school year, and demonstrations serve a dual purpose of humanizing you to your class so you’re not just a robot-taskmaster emailing them about deadlines, as well as showing and not just telling how something can be done. This method of instruction is more equitable for students with learning differences and, frankly, it’s popular with a generation that has grown up watching screens. Demos are personal moments where instructors really share their knowledge, put their spin on a subject, and address common mistakes with advice for how to avoid them. When done well, they are the very best parts of education.
Certainly, cut the 5 minutes at the beginning where you didn’t realize you were recording and used the camera to adjust your hair, but don’t spend a day editing and perfecting a video your students will watch a couple of times and then forget because they got what they needed from it.
In making a demo for your class, the first fork in the road will have you choose either to shoot your demo live, with your students there to watch you fumble and hopefully succeed, or to pre-record it on a device using software such as Camtasia or Screencastify. The big difference is that pre-recording gives you the option of editing so you can present a polished video for your students.
Both methods are reasonable and workable but I believe live demos are the best approach for most instructors. The reason for this is manifold: For educators with no prior video experience, adding the step of editing is another barrier to entry; editing is an art in and of itself (think of reality TV and how that phrase is an oxymoron); and the time involved in making a demo doubles or even triples when more than light editing is required. A live demo best mimics the labor you would be doing in the classroom and recreates the informal or conversational nature of in-person classroom interactions.
Rebecca Barrett-Fox’s widely circulated essay, “Please do a bad job of putting your class online,” published at the beginning of the pandemic, boldly states that “editing is a waste of your time right now,” among other solid arguments for doing our best but also saving our sanity. I would argue, four months later, it’s still a waste of your time, unless you are trying to start an income-generating YouTube channel or create an archive of videos for future use.
Certainly, if you choose to pre-record content for your classes, cut the 5 minutes at the beginning where you didn’t realize you were recording and used the camera to adjust your hair. For a video that feels too long, go ahead and speed up parts with time-lapse. Use iMovie and even allow yourself to improve the aesthetics of the in-app captions, but don’t spend a day editing and perfecting a video your students will watch a couple of times and then forget because they got what they needed from it. Relieve yourself of the pressure to create a perfect product. Instead, gather your materials, prepare some notes, and spend real time with students showing them how to do something. Record that live demo and post it for students who couldn’t attend.
This summer, whip out your smartphone, DSLR, or laptop. Invest in good lighting and find a way to make your dog stop barking the background. Record a video of yourself doing your favorite part of your job, that maybe it feels like you haven’t gotten to do much of since the switch to online learning: Make a video where you teach something. I’m pretty sure your students will love it.
Practical Tips For Getting Started Making Live Demos
1. Get the Right(ish) Equipment.
To film a live demo, you will need a second camera along with your computer’s built-in camera. This second camera can be your phone, an actual camera or webcam, or a tablet. The second camera can be hooked up to your computer with a cord, through Bluetooth, or it can be another participant in the Zoom meeting. (In order to be logged in to Zoom on two devices at once, you’ll need a second email address to create another account.)
Along with recording equipment, you will need a tripod, suspension setup, or phone holder. I resisted buying a tabletop phone holder and then realized I was being stubborn for no reason. This thing has made my life so much easier than the car phone holder I put on a bamboo stake and stuck in a plant to shoot my first live demo. Other suspension rigs require more desk space but allow you to shoot larger spaces—most of my demos must take place within an 8×12-inch space. Whatever you use to hold up your device, its most critical role is keeping the device steady; if you use something that moves, keep looking for something better.
Finally, you may need to upgrade the lighting in the room where you’re recording. Professional YouTubers recommend ring lights for all their makeup tutorial needs but for most of us, an adjustable daylight lamp will do the job. I bought this one in May after getting fed up with my duo of Ikea lamps and I regret nothing. Try to light both yourself and your demo space, and experiment with moving lamps around to improve the lighting conditions. I recommend using painters tape to indicate where you decided was the perfect spot for later in case your partner wants their bedside table lamp back between classes.
Some schools will reimburse instructors the cost of the essential pieces of remote learning equipment or have loaners you can borrow, so check in with your department chair before you buy anything.
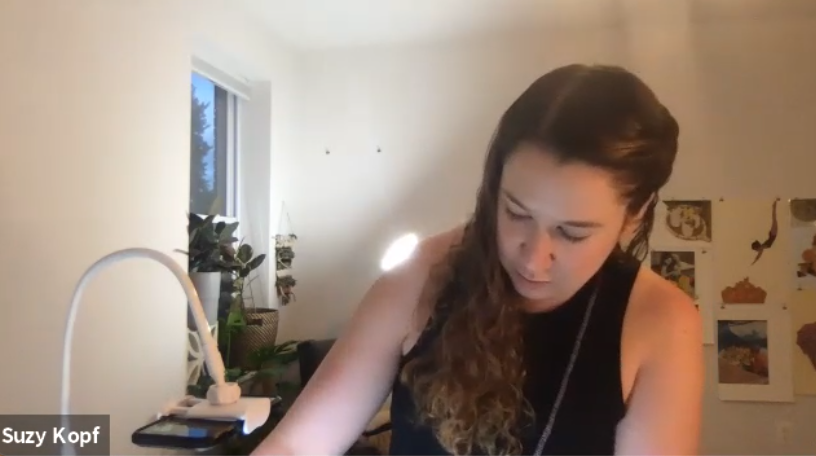
In my typical set up for demos by the window in my studio, you can see in the foreground the phone holder with my phone filming a “top down” view as well as this view which is captured from my computer’s camera. Note the extra IKEA light in the background, which is in addition to the two other lights I have positioned around the room for maximum lighting on both me and my work.
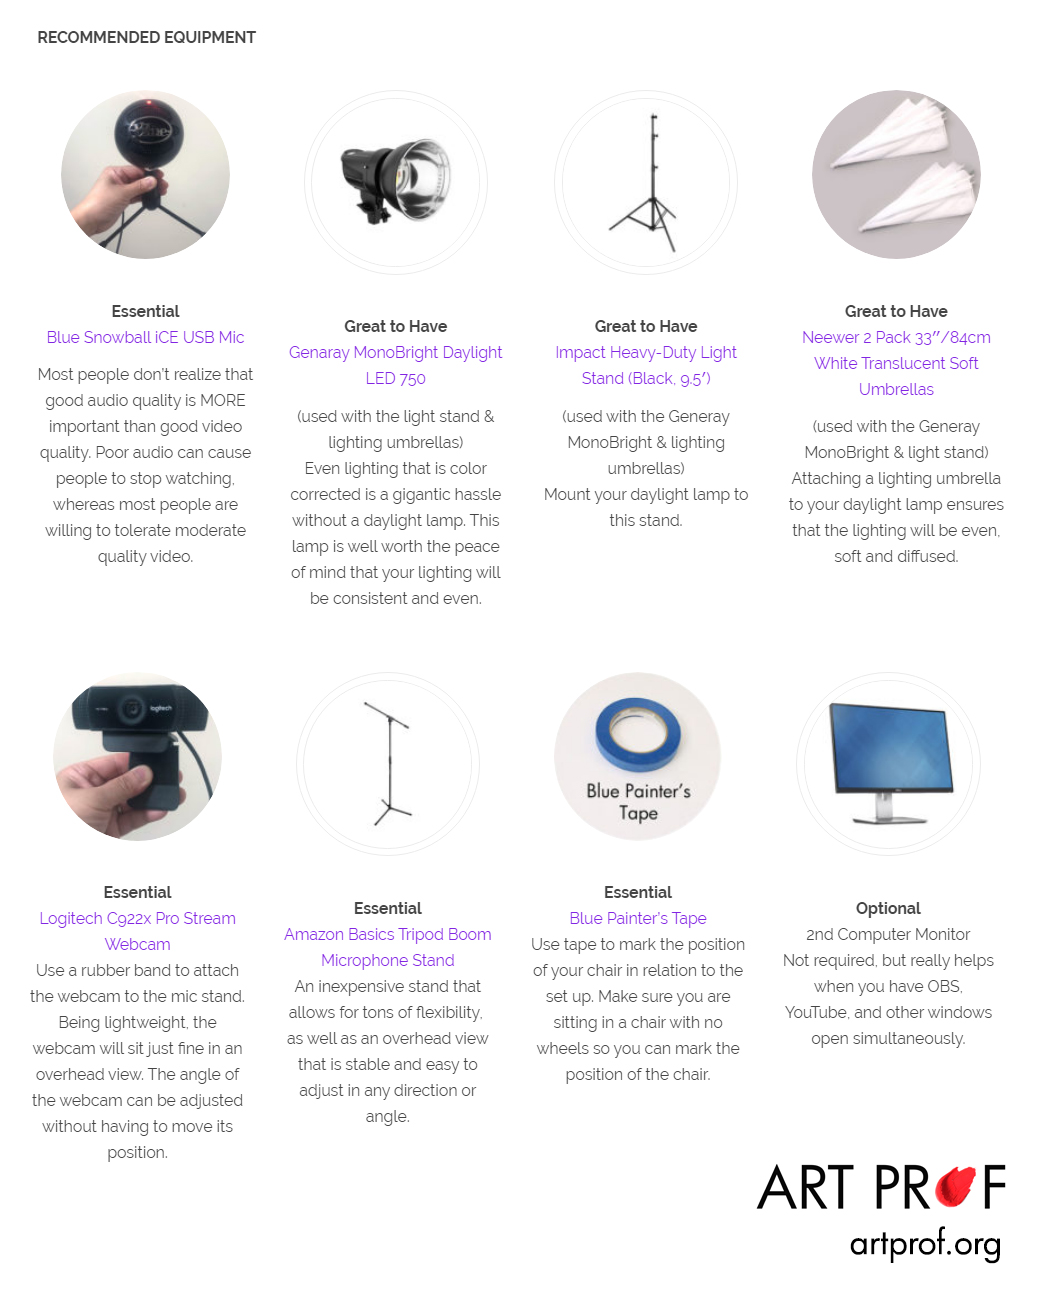
Carla Lieu, a former RISD adjunct, has created the invaluable YouTube Channel and website artprof.org. These are her recommended pieces of equipment for recording demos.
2. Have a Plan for What You Are Trying to Teach.
You probably already have an idea of what you want to demonstrate, but it helps to write it down for yourself as a series of bullet points. For a recent live demo I did on how to paint hair realistically in watercolor, I wrote the following notes for myself and had them off-camera to reference as I needed them:
-
- Start with a base layer of light color
- Test out colors first, explain that watercolor dries lighter or differently
- Focus primarily on value, most hair is variations of value within one hue
- Layering color is how to make hair look crisp and realistic
- Allow layers to dry!
- Follow the line of hair from crown to end, do not invent lines that are not there
- Don’t outline every strand
- Be patient with the process and add details at the very end
All pretty standard ideas about painting that I might have forgotten in my nervousness while live demoing. Knowing that I had a plan for what to cover and that I could look over at it whenever I wanted helped me relax and act more naturally during the demo.
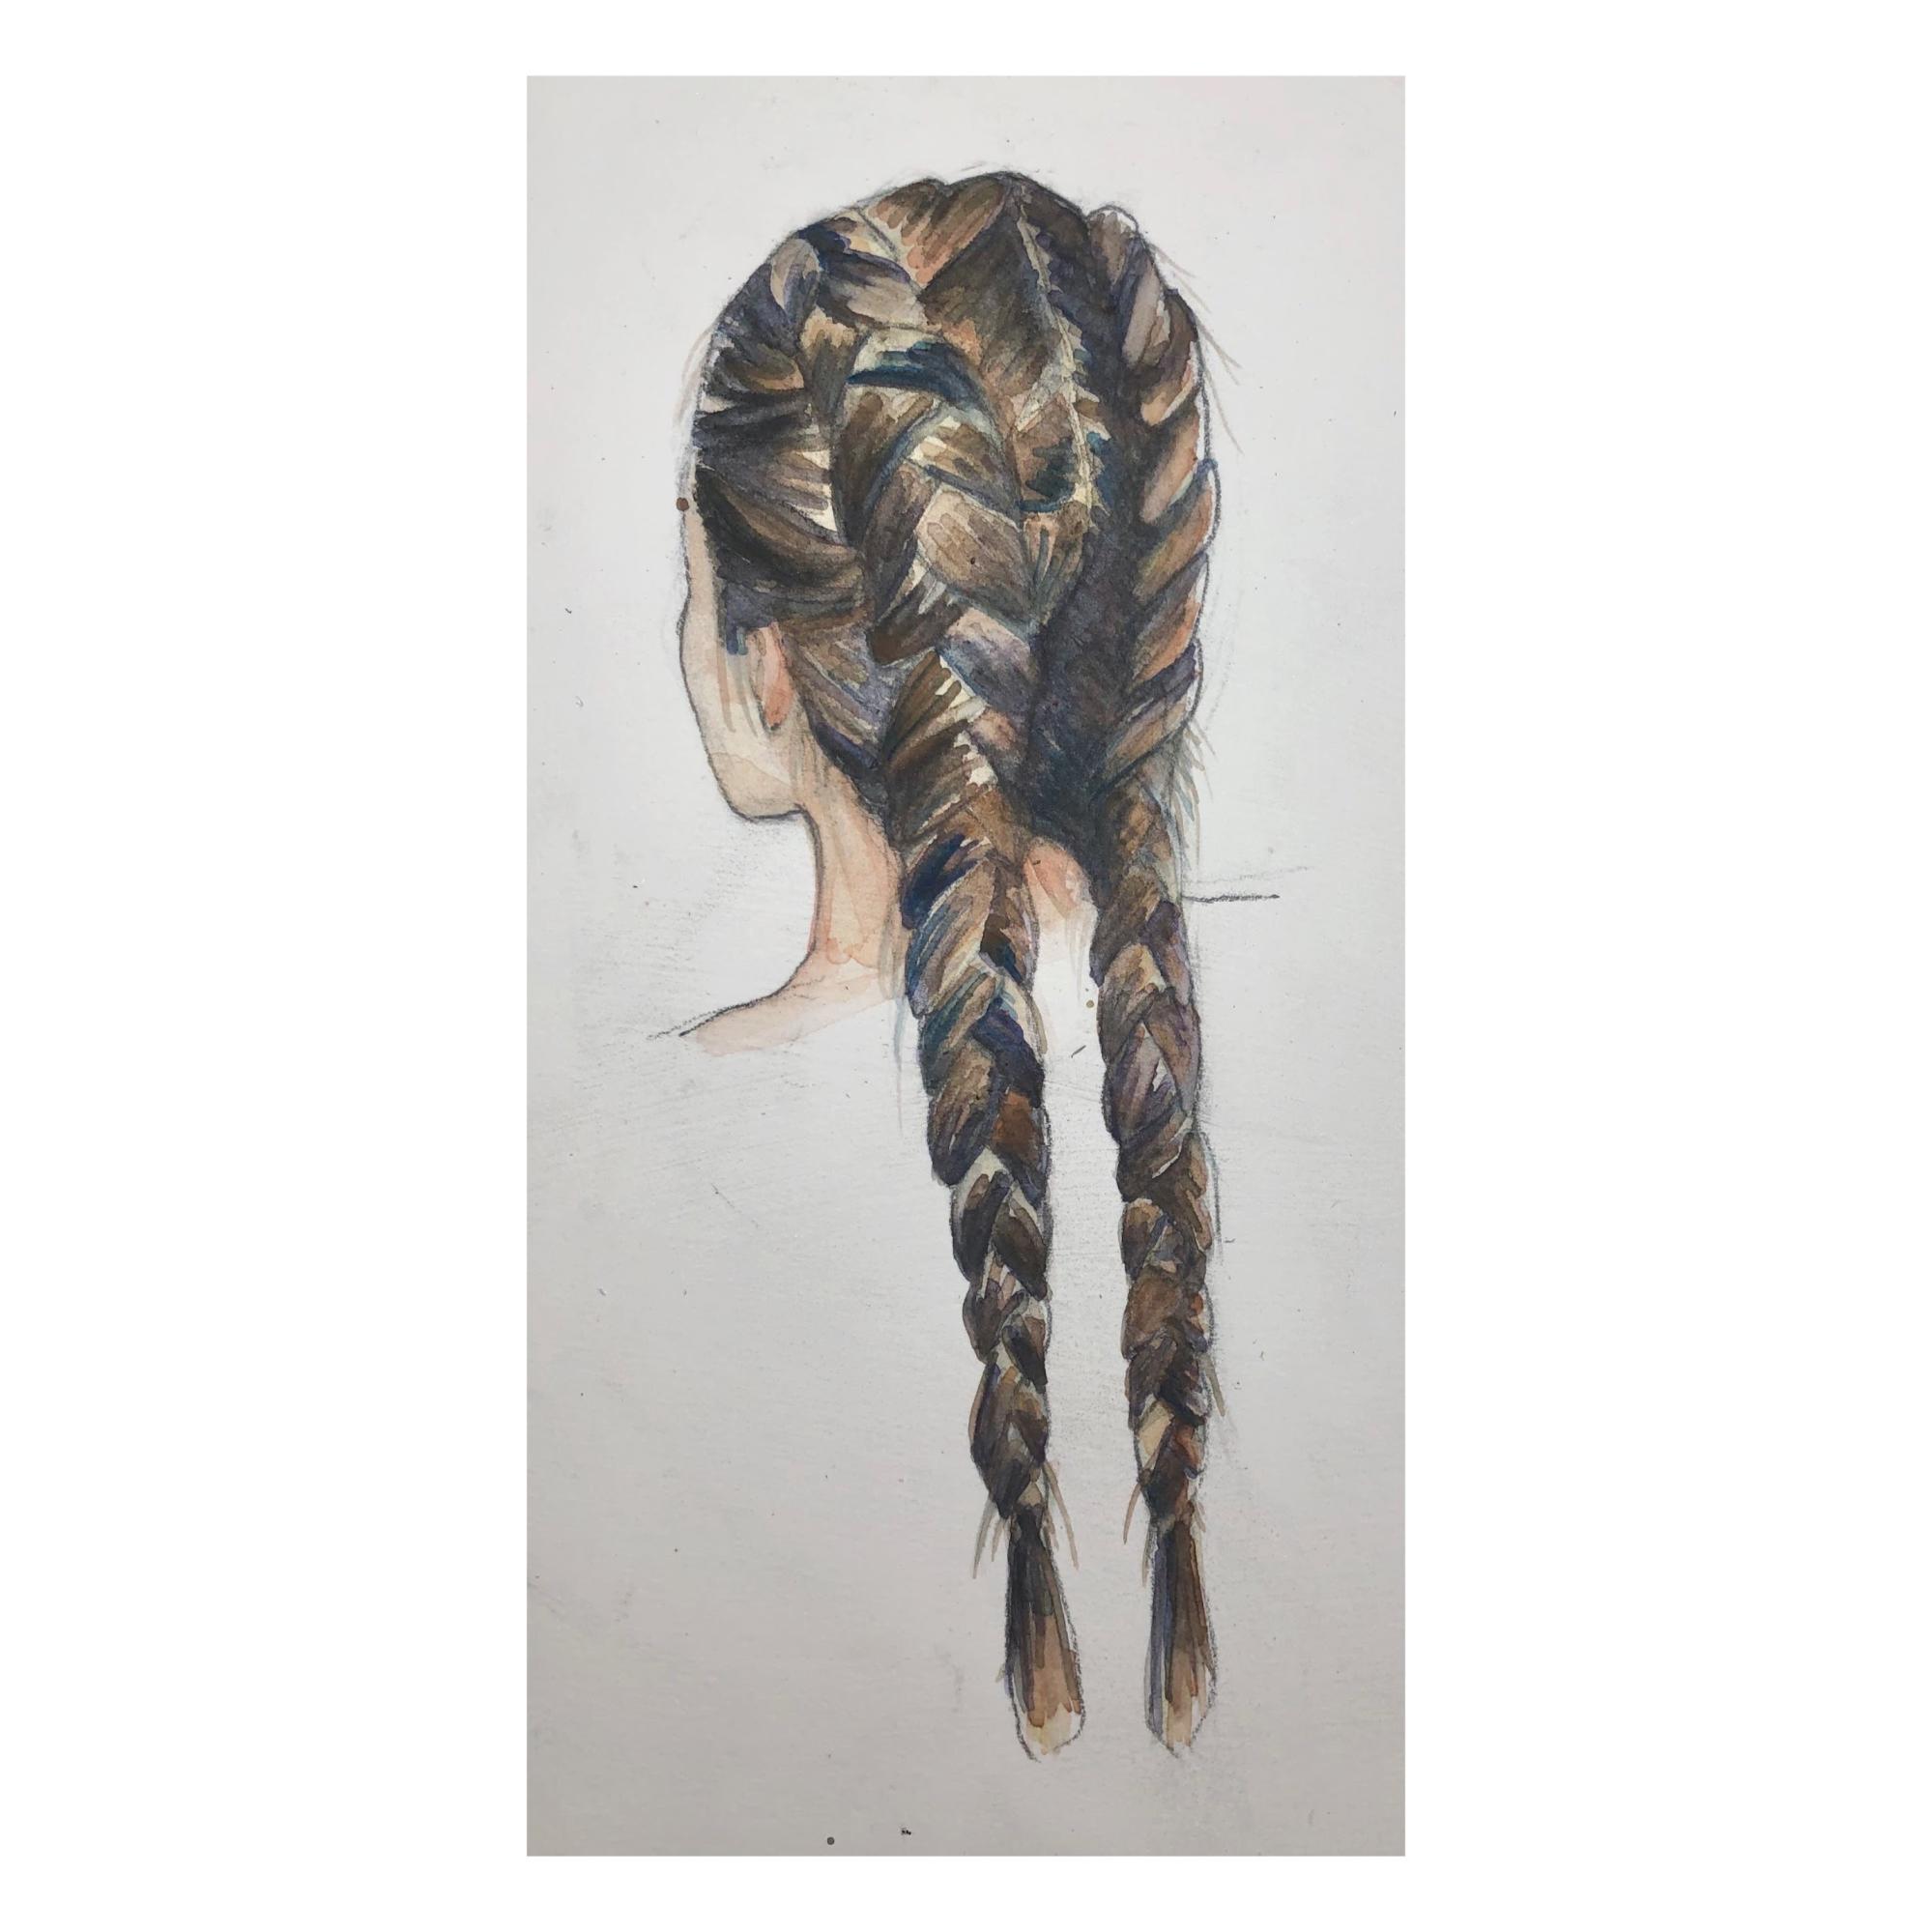
Resulting painting I made during the hair video I described above.
3. Have Examples of Different Stages of the Process, Including Failures.
Hopefully, whatever you are demoing is something you have done before with varying degrees of success. Dig up examples, even those you now know could be improved. One benefit of teaching from home is you probably have an archive of past work you can parade out that you normally would not have brought into the classroom. Use anything you have and look up other examples online to share in advance of your demo. Post these images with the recording for students to reference. If you are showing stages of a longer process through a series of demos, it helps to also have examples of those parts of the process so viewers can connect with the progression of the technique that’s demonstrated.
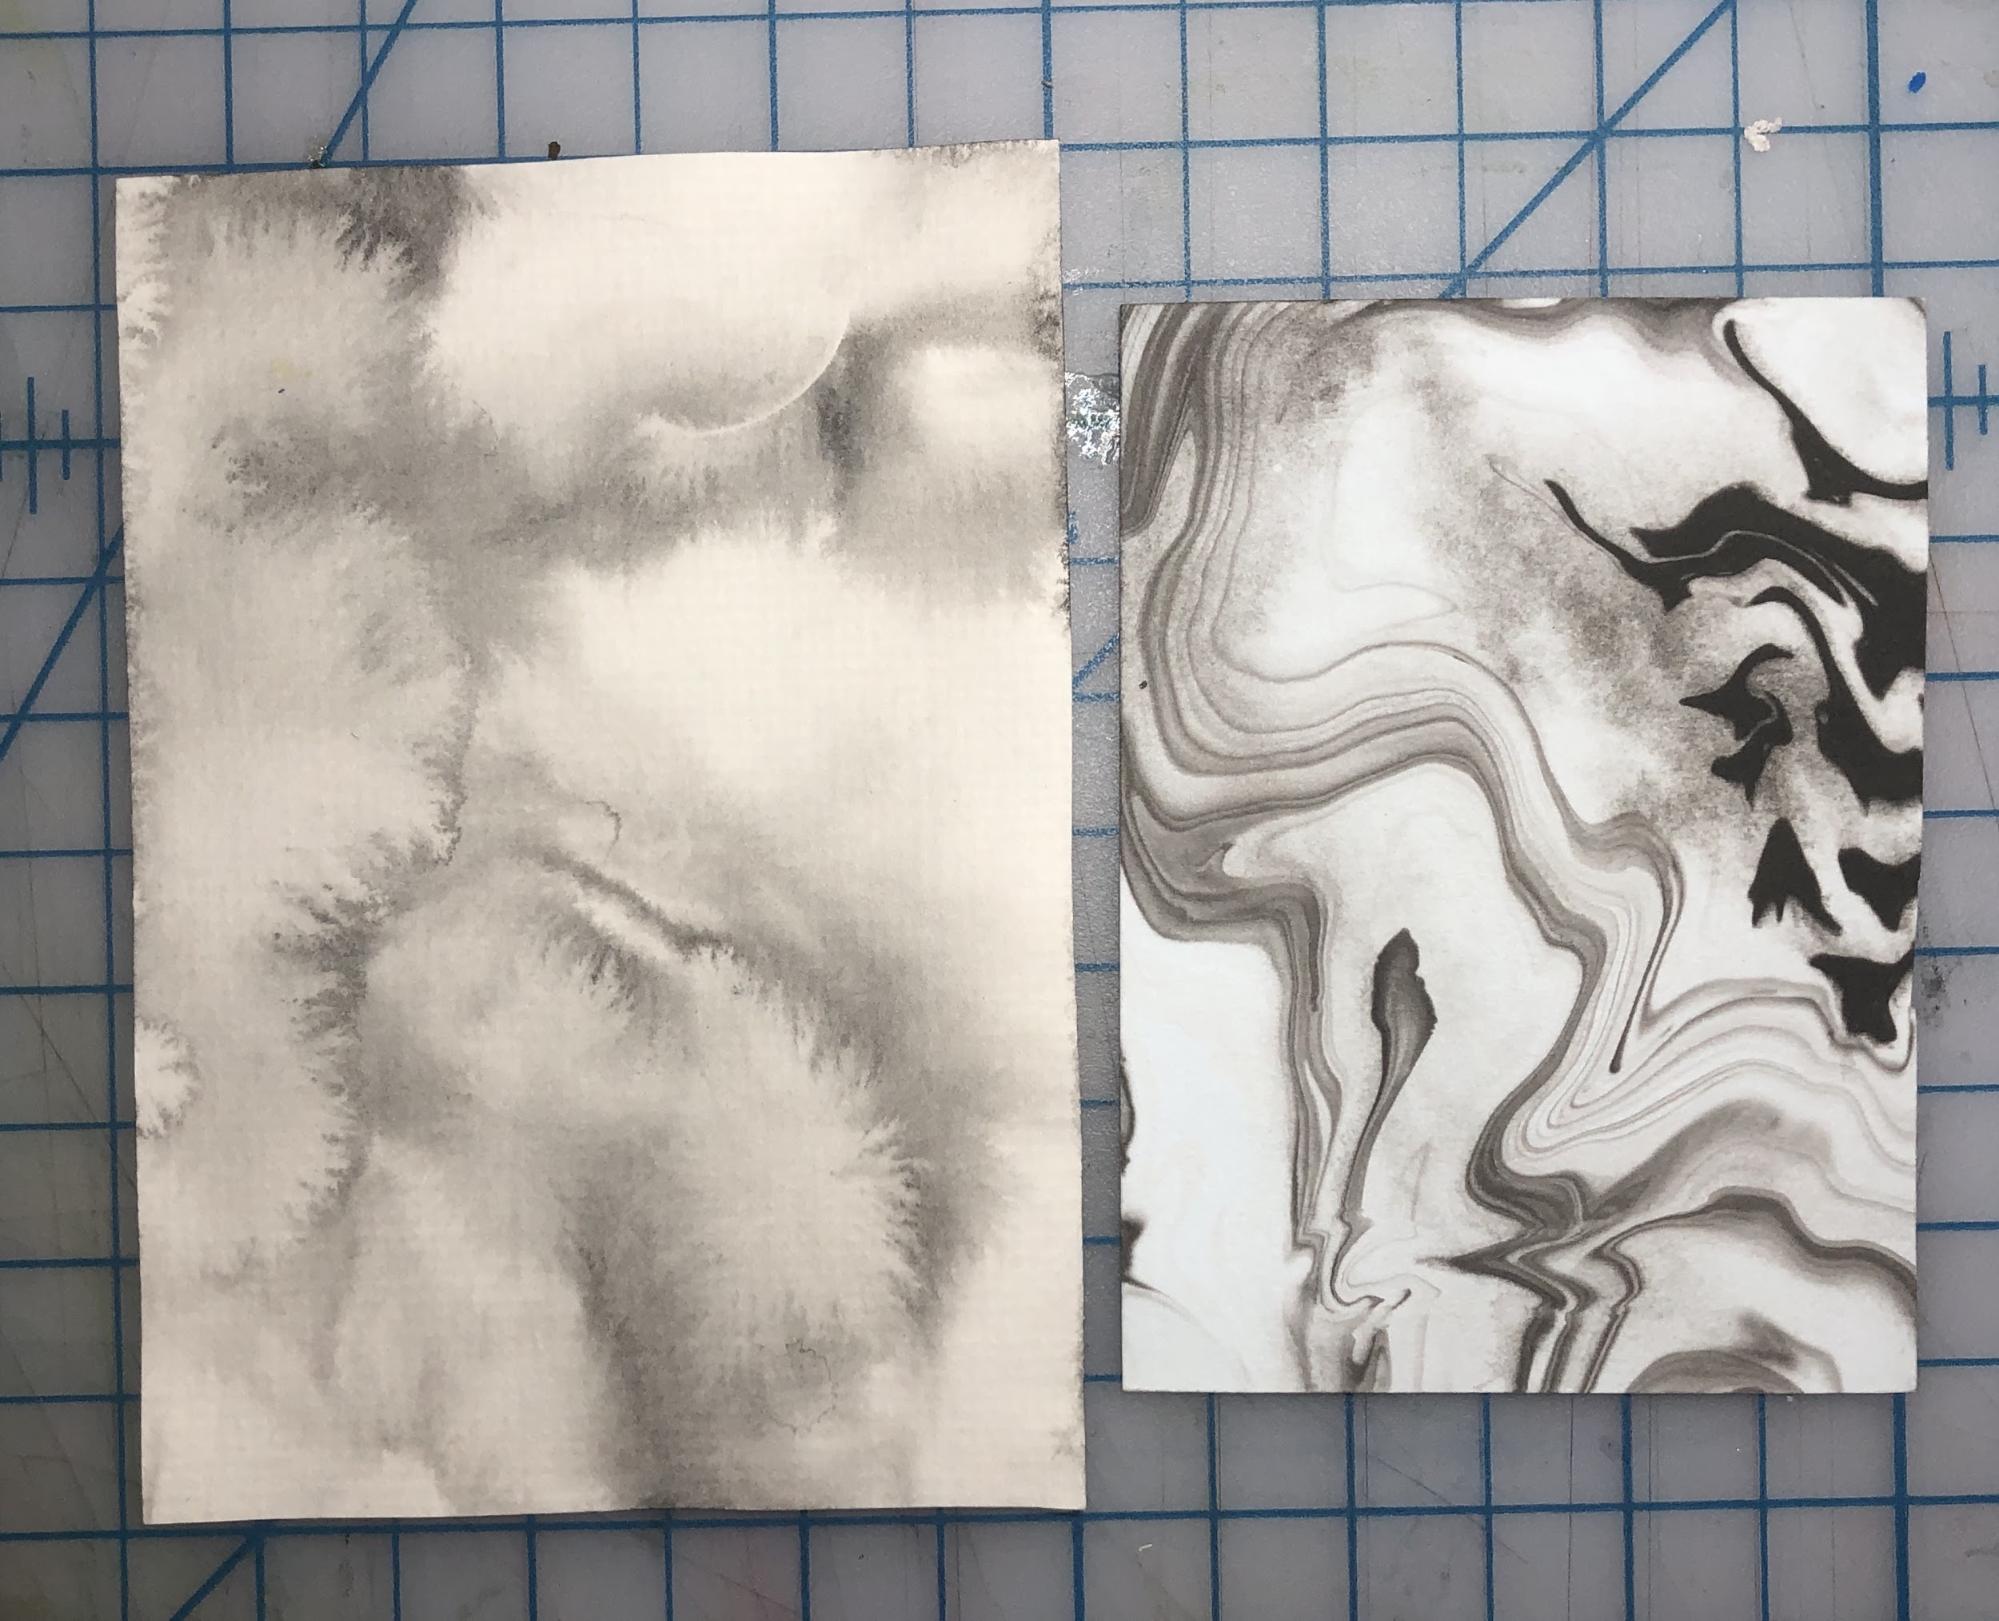
For a demo on the Japanese art of Suminagashi, which is a kind of paper marbling using sumi-e ink, I created these two examples prior to class to explain the importance of using 100% cotton rag for the marbling process. The example on the left is treated drawing paper which seems to repel the ink, causing areas of bleeding. The example on the right is on 100% cotton rag paper, often used for printing, and it absorbed the ink design perfectly from the water as a result. For further examples of Suminagashi failures (it’s a tough process to nail!) there are many short videos on YouTube of what not to do.
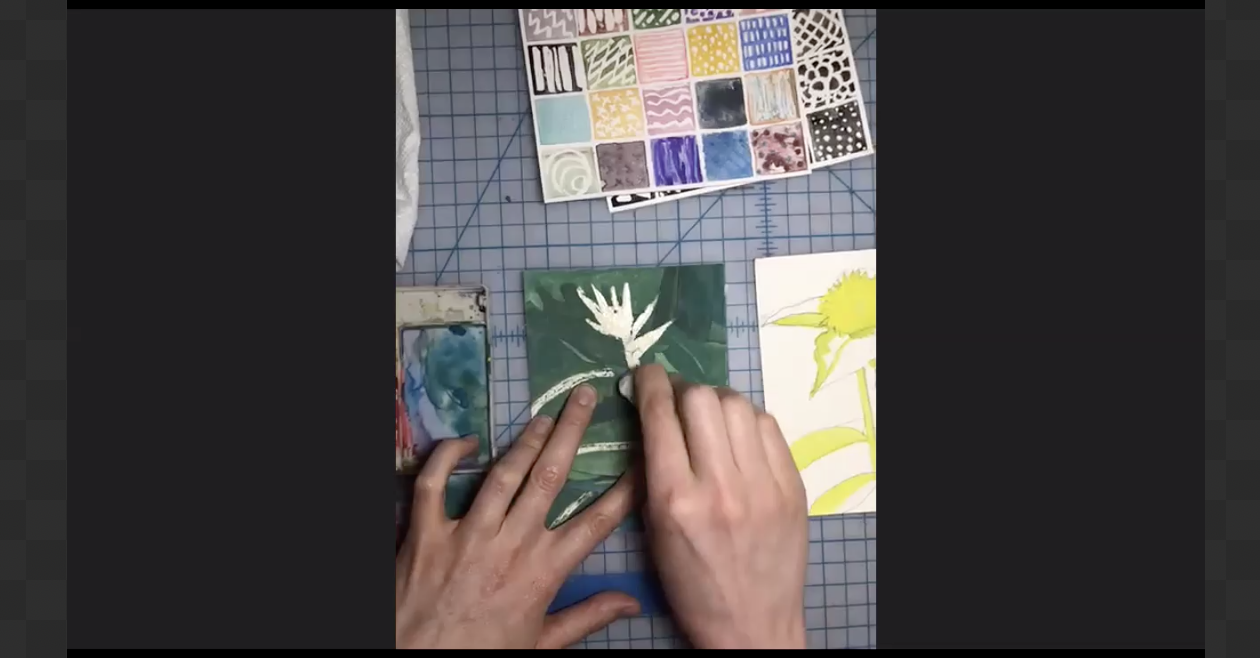
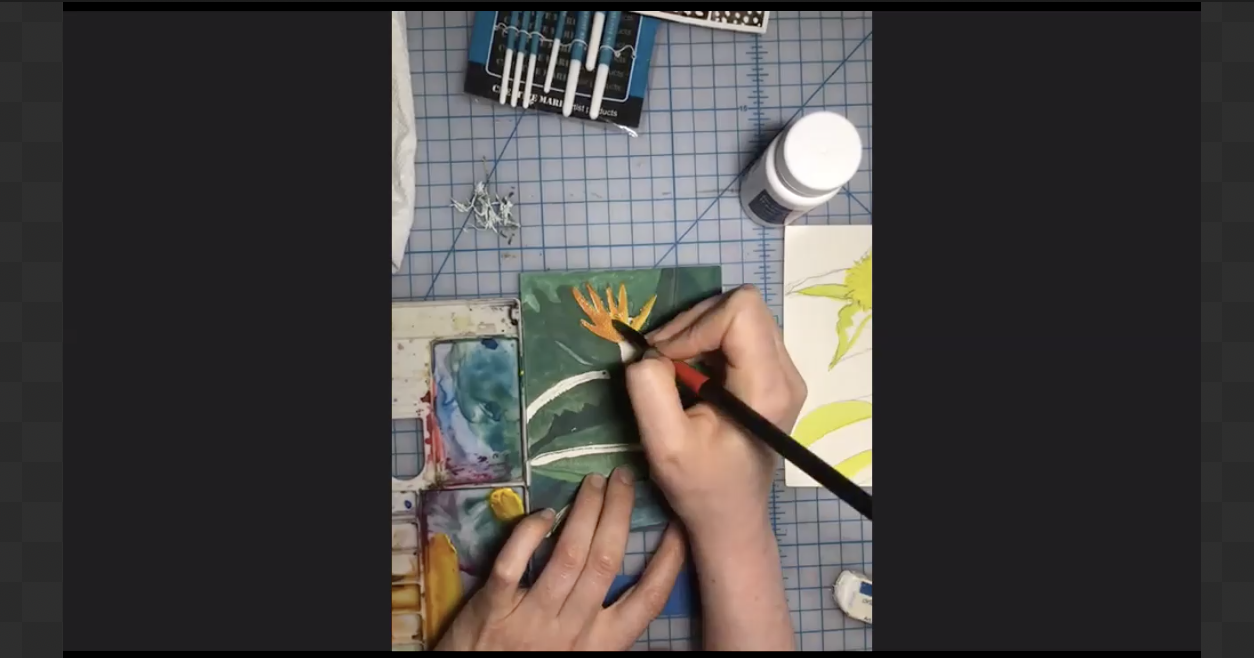
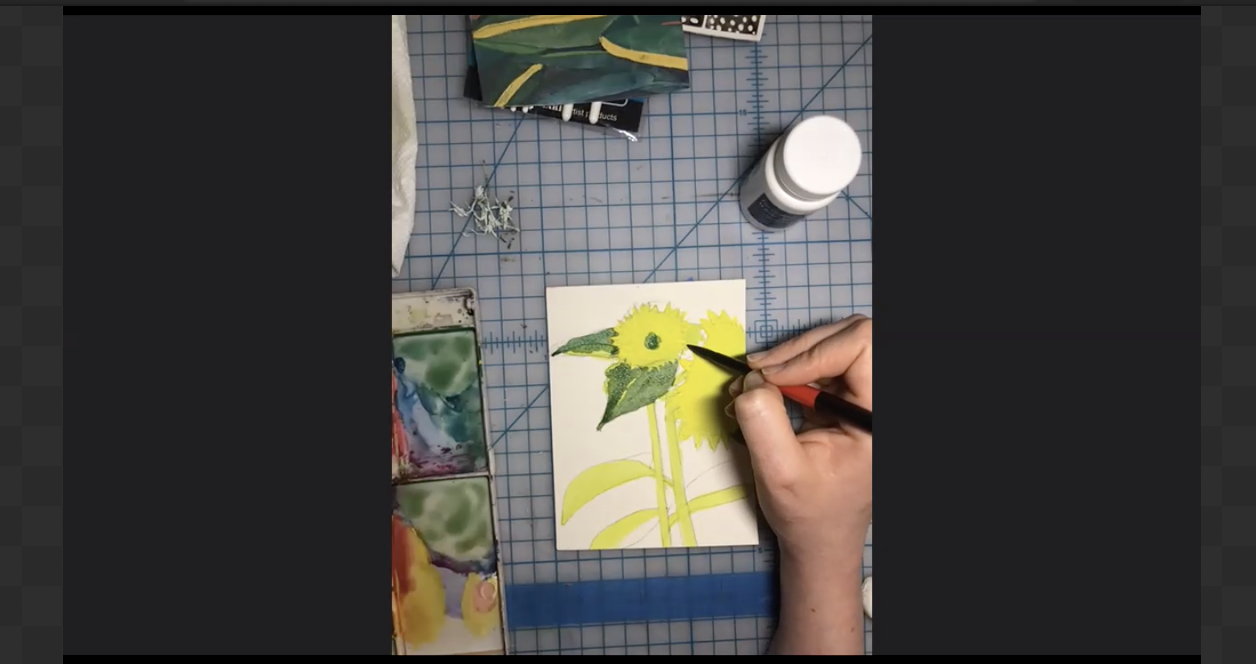
In this live demo on how to use masking fluid, I made some test samples in advance of class, pictured in the top left of the first image, which I used to explain what masking fluid can be used for. Then, throughout the hour-long demo, I switched back and forth between my examples of painting from the background to the foreground (the bird of paradise painting) and the foreground to the background (the sunflower painting). This allowed the paintings to dry while I was working on the other one and demonstrated two ways of working at once.
4. Assume At Least One Student Will Have No Idea What You’re Talking About.
In a classroom environment, everyone learns differently, so there is often a student who appears totally lost when you introduce a new topic. Seeing this person’s face, you might be motivated to slow down, go back, and explain any terms you realize are art jargon. During your live demo, you’re going to be focused on making something happen on camera in a reasonable amount of time. As a result, you might not be looking at your students’ faces in the Zoom meeting, so make sure you are teaching to the entire room. Allow questions during or at the end as you are comfortable, but assume, just as with face-to-face instruction, there will be students with questions they are not asking, so try to anticipate their concerns and work them into your presentation.
5. Get Down to Business.
You have gathered materials and equipment, your partner is loudly complaining there are no lamps anywhere else in the house, and you’ve written a demo lesson plan, so you’re ready to make a movie, right? Right! Do not cave to imposter syndrome feelings now. You are doing this thing. It’s totally normal to feel nervous when preparing to demonstrate something so it helps to remember that your students are humans too. If something goes wrong, that is teachable, and no one is going to fault you for giving it your best effort. You most likely are not an aspiring internet star and no one expects that.
If all else fails, try to channel the confidence of Oprah. Source: Memegenerator
6. Practice with Friends or On Your Own.
At this point in the pandemic, you should know how to use Zoom. You should be scheduling meetings and attending them with ease, sharing your screen with confidence, and writing in the chatbox when prompted. If any of these things are difficult for you or you want to bone up on your skills as part of getting used to live demoing, there are a number of helpful videos on how to use more of the Zoom features. Especially relevant to educators demonstrating online, the annotate and whiteboard tools are worth learning how to use properly. Schedule a call with friends and practice trying different features. They can screengrab and send you what it looks like on their end so you have an idea of what students will see when you’re ready to go live.
Additionally, you can practice your entire demo on your own and record it before going live. Doing a demo more than once will improve your confidence and remind you of what you need to cover if you’re not 100 percent confident you got it all in your lesson plan.
7. Keep It Short, Split It Up, or Speed Up the Boring Parts.
Just because it would take you 5 hours to complete a part of the process you’re demoing does not mean your demo needs to be 5+ hours. Instead, focus on the confusing or difficult parts of a longer process and just demonstrate them. Instructor Laurie Gatlin’s video on exposing cyanotypes does a great job of speeding up a longer process, getting the pre-recorded video down to less than two minutes. Most people can only focus for about an hour on Zoom so strong demos are short and keep it moving. Consider if you can show more than one way to do something and explain the merits of each approach. For demoing painting, I almost always do the drawing in advance of class, then demonstrate how I would start a painting from the drawing. About halfway through a painting, I’ll switch to another painting that is already at the halfway point but dry and then demo how to finish a painting in a technique different from how I started the first one.
-
8. List and Link All Equipment Used and Plus Any Extra Recommendations.
It may seem obvious to you but your students may not have all the same materials or access that you have. Always list materials used in a demo and, when possible, link to where students can source them for themselves. While more produced and edited than I recommend attempting as a novice, Cam Earven of The Print Life YouTube channel does a great job of letting viewers know what materials he uses in his screenprinting videos. Students also appreciate extra recommendations for supplies, equipment, or additional videos of other people demonstrating a process. All of these resources support the original work you are doing.
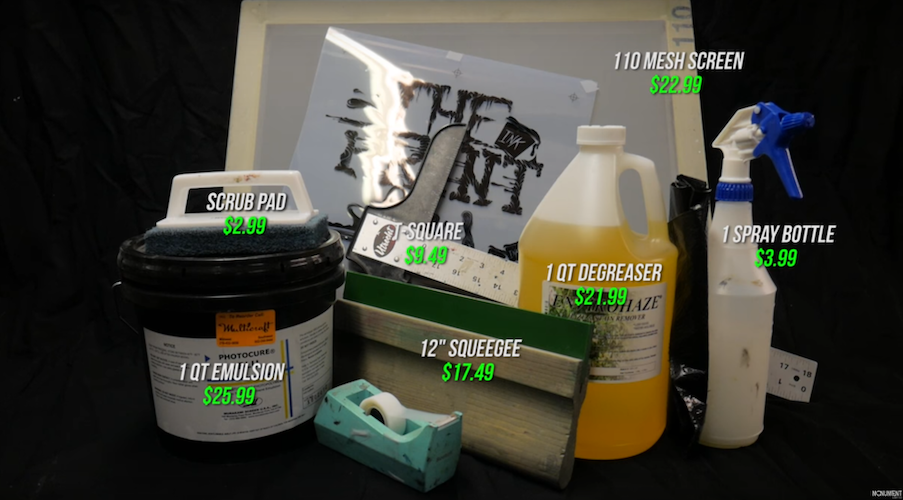
Screenshot from the “Burn a Silkscreen Printing Frame” video by The Print Life that shows all the supplies and their cost. Such a visual could be created ahead of a demo to prepare students for what they will need to source.